The UAC | Walkthrough Doom Guide
Last update: 09 June 2016
Find the Site 03 exit

You start the first level with the basic pistol and a pair of weak opponents to kill. Shoot them from distance and then walk towards the panel on the right side of the door. Use it to unlock the passage. After playing a short holorecord the door will open. Behind it you will find your armor, the Praetor Suit. Put it on and go forward.

In the corridor you will find a highlighted opponent. Walk towards him and perform the so-called Glory Kill. It is a very important ability which you will use during the whole game. The possibility to perform Glory Kill appears after you deal large number of damage to the opponent. It is worth performing these executions as they are not only effective, but they regain health points as well. Further in the corridor you will encounter few weak enemies - the Possessed. They are great energy sources during harder battles. The easiest way to get rid of them is by pressing the melee attack button twice. By doing so your character will first weaken the enemy and then perform a Glory Kill, thus saving some ammunition.

Slightly further you will find locked door. Pick up weapon (Combat Shotgun) held by the nearby corpse before opening it. In the next room you will encounter a new enemy type - Imp. These quick beasts are able to climb on walls and shoot fireballs. Try getting rid of them in first order and constantly running to avoid being hit. It is best to shoot the creature with a shotgun from close distance and then perform a Glory Kill.
Destroy the Gore Nest

Your next objective is to destroy the Gore Nest in the nearby room. In order to destroy it you must find a special tumor and crush it with the use button. But first you must break through a group of enemies. Don't waste ammunition on them. Instead, kill them with quick melee attacks and Glory Kills. The shotgun will be useful very soon - once you complete the objective, Imps will start appearing in the room. In order to survive the encounter, try running around the room and killing the nearest opponents. This will allow you to avoid being surrounded and you will be able to collect health kits and ammunition placed at the walls. You can also jump on higher platforms from where it is easier to find the enemy. In order to do it, press the jump button again when you're next to the edge. Your character will climb up. Once the battle is over, walk slightly further, enter the elevator and ride to the upper floor.
Find the Resource Ops entrance

Once you get to the surface of the planet, jump down and go straight ahead. Don't worry about the height. Your armor will absorb the impact of the fall. Stick to the right side of the canyon, you will find ammunition and first data log. Slightly further there is an encounter with large number of enemies. Among them there will be few Possessed Soldiers. They are slow, but quite resistant. They will mostly shoot at you with fast machine guns, but from time to time they will also shoot large glowing balls which explode after some time and deal large number of damage. Try getting rid of these enemies in first order.

Before you jump down, look closely to the arena on which you will fight. Similarly as in previous encounter, it is a good idea to stick to the walls and collect items. First try to quickly pick up the green armors floating on the platform in the middle. Don't kill the Possessed walking around if you don't need to. These weak opponents won't be troublesome and they are a great source of health when fighting stronger enemies. They are a sort of walking medical kits.
Find blue Access key

Once the encounter ends, go to the room on the left. Behind it there are blue door which require blue key. In order to find it you must turn right.

On the left you will find the first elite guard.

You won't jump to it from this side but there is a chest that will make it possible on the other side of the rock. Just remember about pressing the jump button twice.

There is a corpse lying next to the same chest. You will find the blue key next to it. Take it and open the previously bypassed blue door. Behind it you will find a very useful Frag Grenade. It is an equipment item. This type of items never ends but requires waiting some time before it can be used again. You should test it on the enemies walking below.

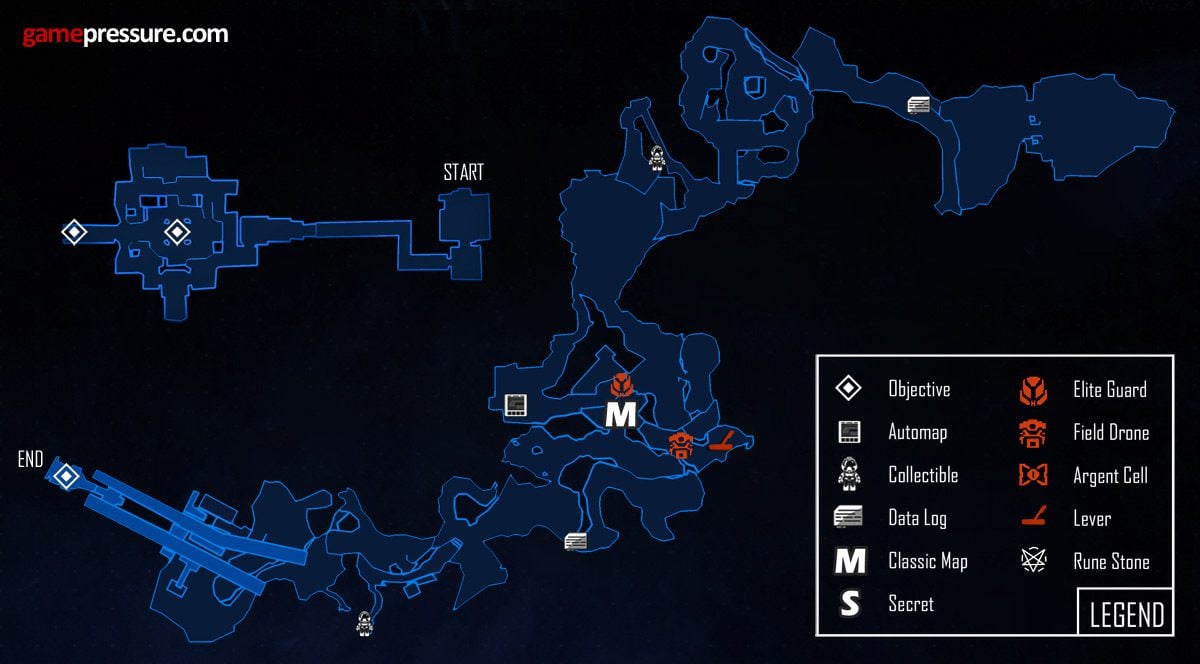
Once you kill everyone, go further until the crossroad. Select the path to the right, kill some demons and use the panel in the cave. This will unlock the whole map of the location - sadly with no secrets and items marked on it.

There will be a dead guard (Elite Guard) lying at the second exit from the cave. From his armor you can obtain a component that allows upgrading your armor. Once you select an improvement, jump down and kill other opponents. The battle won't be hard - few Possessed and Imps.

Go to the right after the battle, to the chests standing at the edge. Now you can do one of two things.

If you turn around while standing on the chests, you should notice a passage between the bars on the left side.

Behind it you will find a lever that will unlock passage to a classic map.

Once you complete it, climb up on the previously mentioned chests and then jump to the ledge on the right. The path that is there will lead you to the armor, medical kit and Data Log.

When you will be returning, climb on the wall ahead. On the left there will be a cave and inside you can collect a Combat Support Drone. Buy one Shotgun enhancement from it. Charged Burst will be useful for completing the challenge on the second level of the game. After shopping you will be attacked by a small group of enemies. Kill the incoming opponents and use the rock covers to protection. Grenade will be very effective at the start of the battle.

Once the first group is dead, keep going ahead. In the narrow canyon you will be attacked again. This time the Imps will stand on the ledges to which you must quickly jump.

Instead of that you can turn to the badly visible passage on the left.

At its end you will find the second collectible model and a passage to the further part of the location. From this side it will be easier for you to get the enemies. Many enemies will be also slightly further. In first order you should kill the Possessed Soldiers around which you can easily run and shoot them from behind.

Once the encounter is over, climb at the top of the building. There you will find green door behind which there is a panel that ends the level. Before you go there, go to the destroyed tracks. In the chests there are many useful items hidden.

